Hello again and welcome to this week's installment of Cue by Cue!
Before starting today's content, I want to offer a brief addendum to last week's post thanks to some new discoveries this week. Last week I said I didn't have any scans of the original production sheet music for 1m2 Star Wars, which was true last week - however, thanks to an auction listing posted just a couple days ago, I am now happy to present the first page of John Williams' handwritten sketch for the cue:
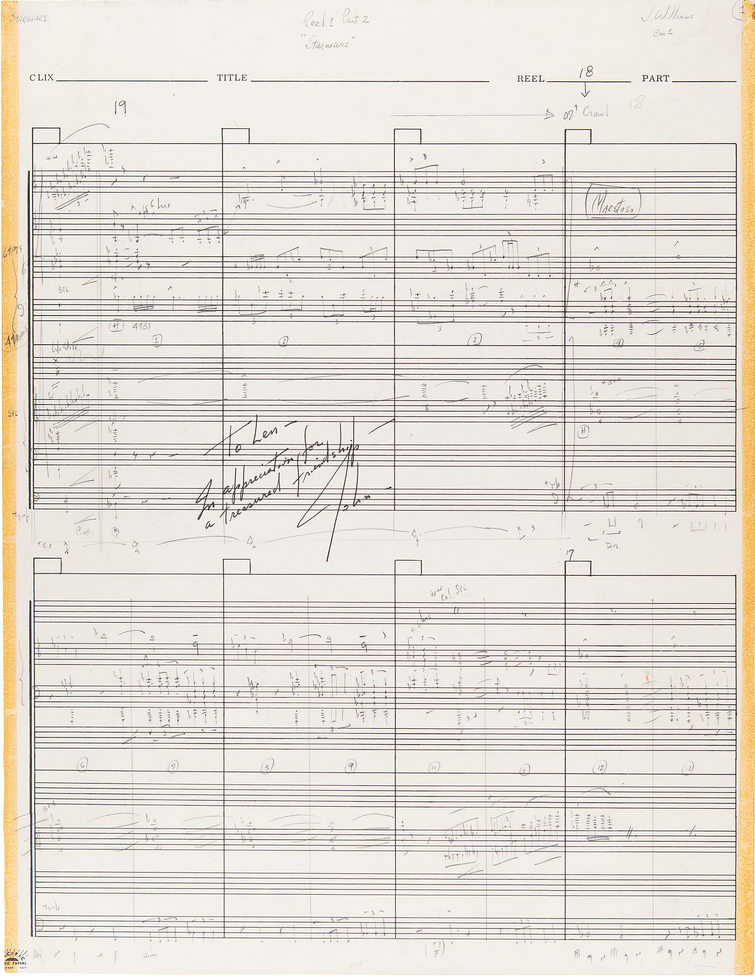
This of course still doesn't tell us who orchestrated it, as it's the 8-line sketch and not the full conductor sheet. Also the signature/note in black text is not original to the sketch, it's a signed copy that was given to a crew member. Regardless, it's very cool to see, and it's now the only cue from this score for which I have any scans of an original sketch.
Now, onto today's cue...
This week, we'll be listening to 1m3 The War.
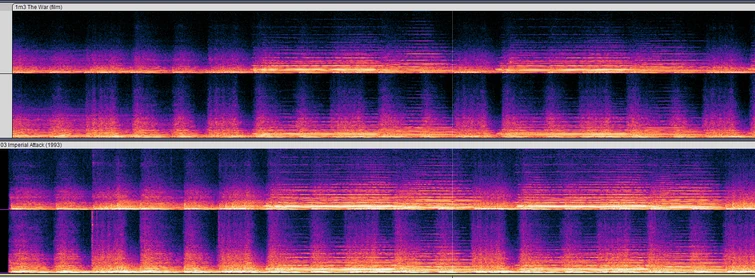
This cue is 129 bars long and was orchestrated by Herbert Spencer. Here's what the top third of page 1 of the conductor's score looks like:

As usual, let's listen to the cue together, and then we can talk about it in more detail:

Listen along commentary:
At 0:00 the cue begins immediately with the Rebel Theme's rhythm, with the theme itself kicking in at 0:03 right as we see some rebel troopers. The theme continues for a little while as they get into defensive positions.
At 0:36 the tension and pace of the rhythm increases as rumbling can be heard outside, and then at 0:44 we get a loud brass crescendo as the Star Destroyer docks with the Tantive IV.
0:51 returns us to the rebel rhythm as we see the droids and troops again, fading away to some hesitant woodwinds and percussion at 0:58.
The music picks up again once the door starts sparking at 1:03, building into the first appearance of this score's Imperial theme at 1:11 (not the same as the Imperial March, that won't appear until The Empire Strikes Back). This action variant of the Imperial theme continues until 1:33, as the stormtroopers decimate the rebels.
At 1:33 we get some transitionary strings as the screen fills with smoke and the scene fades. 1:39 marks a percussion-y return to the Rebel theme as the droids cross the blaster-filled hallway. Notably, this shot was cut short with a jump cut right before the explosion in the final film, leading to a music edit later on. Since I'm presenting the uncut music as recorded, I had to insert a black screen for 1 second at 1:52 to maintain the sync.
The rebel theme falls off around 1:56 as the troopers retreat, leading way for a brass crescendo for Vader's entrance at 2:01. This crescendo is very similar to the Death Star theme, but has some notable differences including having less and different notes.
The brass falls away to some light percussion, and we get 3 drum hits for each of Vader's 3 turns. In the final film, the music actually plays out of sync here due to that jump cut I mentioned earlier, and as a result the drum hits don't line up with the head turns. The music resyncs in the final cut around 2:14, where 1 second of the music was trimmed.
At 2:15 we get some brass for the stormtroopers walking away. I always thought it was curious that the second or two where Vader walks away is almost silent. It's an interesting way to convey the weight of his presence.
At 2:18 the brass falls away and we get our first appearance of Ben's theme, which is played as Leia gives the Death Star plans and her message to R2. This is some interesting thematic foreshadowing, the audience doesn't know it yet but R2 is receiving the "Help Me Obi-Wan Kenobi" message, and so it makes sense to tease his theme here.
Immediately after that, we get the briefest hint of Leia's theme at 2:31. This leads to some more hesitant music for the droids reuniting, with one final even briefer Leia theme statement at 2:52. Again, it's interesting that Leia's theme here plays not when she's on screen, but rather when R2 starts moving to carry out the mission that she gave him.
The music abruptly switches to some harsh brass figures at 2:58 for the stormtroopers marching with some rebel prisoners, which quickly fade into some strange trombones at 3:09 as Vader interrogates a rebel. Tension builds in the strings at 3:22, and there's a big crash at 3:30 when he's dead and Vader throws him.
Lastly at 3:30 we get our final string crescendo, as Vader demands for all passengers to be captured alive. Thus the cue ends.
This cue is used in the final cut almost exactly as it was intended to be, minus that one jump cut that I mentioned earlier. While researching for this post I had briefly considered that it was possible that the shot of C-3PO being tangled in wires had been covered by this cue (in the shooting script it was originally after the hallway explosion before being moved to after the TIE Fighter battle), but I decided that this was unlikely since it was a pretty invasive edit, requiring other things to be cut for the music to still fit. As for why the hallway scene has a jump cut, I'm really not sure honestly. If anyone has any more information about this I'd love to hear about it.
The cue was recorded on March 8, 1977, the second day of the recording sessions. It was the third cue recorded that day. Ten takes of this cue were recorded, labeled 41-50.
Of these ten takes, parts of 44 and 50 were used in the performance edit for the film.
This cue has been officially released on four different albums:
1) In 1977 on 20th Century Records' OST album
2) In 1993 on Arista Records' 4-CD Anthology box set
3) In 1997 on RCA Victor's 2-CD Special Edition set
4) In 2018 on Walt Disney Records' Remastered album (remastered OST rebuilt from scratch from the session masters)
More specifically, 1m3 The War can be heard:
From 0:00-3:14 of track 2 "Imperial Attack" on the 1977/2018 albums
From 0:00-3:37 of disc 1 track 3 "Imperial Attack" on the 1993 album
From 0:00-3:37 of disc 1 track 2 "Imperial Attack" on the 1997 album.
The 1977/2018 releases are cutdown, they're missing the hesitant strings before the door explosion from 0:58-1:05, as well as the music as R2 reunites with C-3PO from 2:41-2:58.

None of the four releases have a clean ending, sadly. The clean ending can be heard in the original 1981 Radio Drama, which had access to the recording sessions, but unfortunately it's buried under sfx and dialogue. I also believe that it may be an alternate take, because it doesn't have the percussion hit at the end of the string crescendo like the film and albums do. For these reasons, I ended up faking a clean ending by fading out the music in the video above. It doesn't sound great, but it's the best I can do with the available sources.
Additionally, the 1977 release is a remix, and the 1993 release uses incorrect takes. For these reasons I would again recommend sticking with the 1997 release for this cue. This is the version used in the video linked above.
Next week we will analyze 1m4-2m1 The Escape Hatch.
Feel free to talk about your thoughts in the comments, or ask any questions!